Antifouling
 Big bottom to paint!
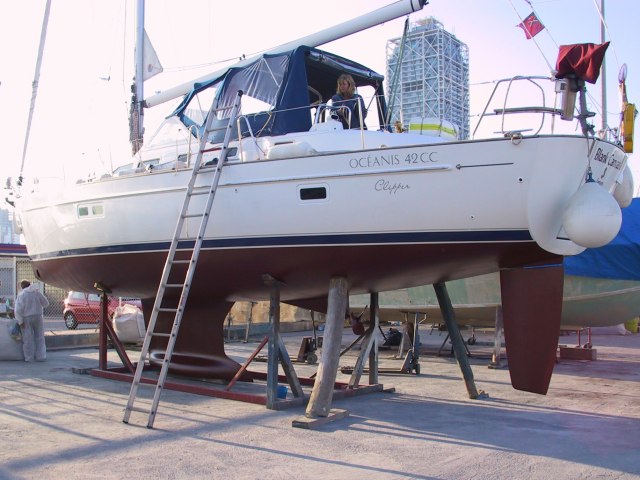
An expensive but necessary job is anti-fouling the hull of the boat below the waterline. This requires having the boat lifted out of the water and chocked up on the hard-standing for anything from three to six days during which time we stay in a hotel. Then we would power-wash the bottom of the boat to remove all the existing barnacles, weed, etc. Masking tape is applied around the hull at the waterline and over skin-fittings which are not to be painted. Usually two coats of antifouling are applied leaving each coat to dry overnight. Although this sounds simple it is painstakingly hard and dirty work. Antifouling paint is increasingly expensive, costing from 50 to 100 pounds a litre and we need 10 litres, plus the cost of other materials, hotel, eating out, lifting out and in, etc bring the total bill to between twelve to fifteen hundred pounds.
Big bottom to paint!
An expensive but necessary job is anti-fouling the hull of the boat below the waterline. This requires having the boat lifted out of the water and chocked up on the hard-standing for anything from three to six days during which time we stay in a hotel. Then we would power-wash the bottom of the boat to remove all the existing barnacles, weed, etc. Masking tape is applied around the hull at the waterline and over skin-fittings which are not to be painted. Usually two coats of antifouling are applied leaving each coat to dry overnight. Although this sounds simple it is painstakingly hard and dirty work. Antifouling paint is increasingly expensive, costing from 50 to 100 pounds a litre and we need 10 litres, plus the cost of other materials, hotel, eating out, lifting out and in, etc bring the total bill to between twelve to fifteen hundred pounds.
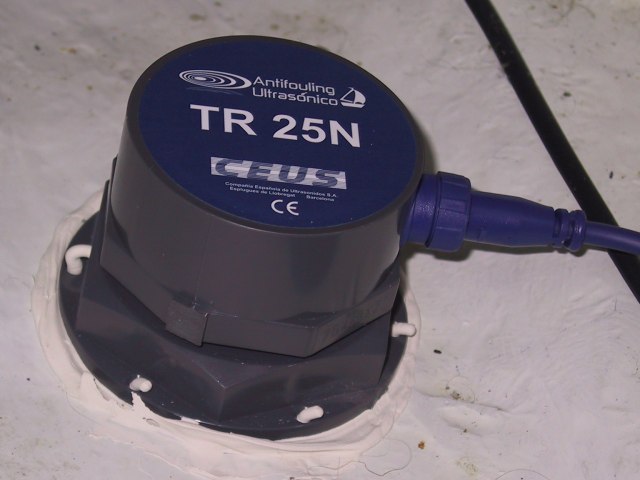 A Transducer fixed in place
A few years ago I tried an alternative which uses copper as the anti-fouling agent. In the early days these were thin copper sheets glued to the bottom of the boat then later copper granules were embedded in a two part epoxy "paint". There are two options, paint it yourself or have a professional team spray it on. In either case you have to remove all antifouling paint AND primer yourself. The professional quote would take a few years to recoup the expense so we opted to do it ourselves. It was still expensive and for us didn't work, although we have talked to people who are happy with it.
A Transducer fixed in place
A few years ago I tried an alternative which uses copper as the anti-fouling agent. In the early days these were thin copper sheets glued to the bottom of the boat then later copper granules were embedded in a two part epoxy "paint". There are two options, paint it yourself or have a professional team spray it on. In either case you have to remove all antifouling paint AND primer yourself. The professional quote would take a few years to recoup the expense so we opted to do it ourselves. It was still expensive and for us didn't work, although we have talked to people who are happy with it.
Ultrasonic antifouling is an affordable alternative to paint and does not need the boat to be lifted out every year. I have looked at various reports and alternate manufactures. They all work on the principal of creating ultrasonic vibrations through the hull which when applied at the correct frequency prevents barnacles etc. from attaching to the boat thus keeping the hull clean.
The components of an ultrasonic system are a control unit which generates the required frequencies and transducers which create the vibrations. Most manufactures quote a two transducers system for boats over 10m, with an overall power consumption of 2 amps. At the boat show I came across ( CEUS Antifouling Ultrasonico), a Barcelona based company with 25 years experience in ultrasonics who have developed a system which uses lower power transducers but more of them thus spreading the vibrations out more evenly.
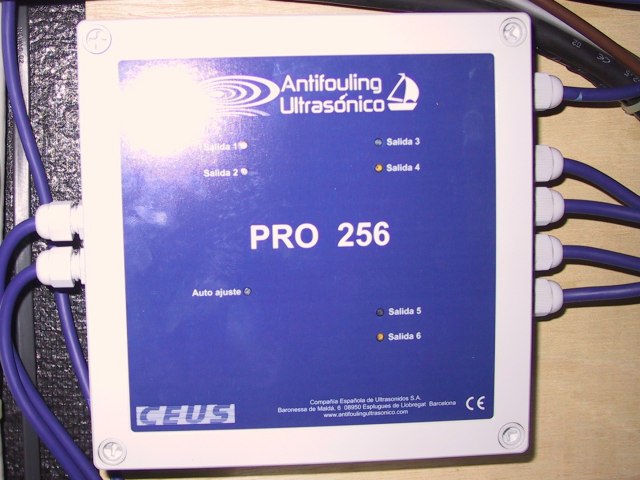
 The control unit
Our boat required a 6 transducer system which by clever design uses half the power of other systems by alternating between two sets of three transducers every few seconds. This low power six transducer system was the same cost as the other manufacturers two transducer system so I was sold and a few days later the system arrived.
The control unit
Our boat required a 6 transducer system which by clever design uses half the power of other systems by alternating between two sets of three transducers every few seconds. This low power six transducer system was the same cost as the other manufacturers two transducer system so I was sold and a few days later the system arrived.
I was very impressed with the quality of packaging and the design of the control unit and cables. All of the installation work can be carried out with the boat in the water, there are no through hull fittings or holes required. The first step is to find a suitable location for the control unit and determine where to fit the transducers. The instructions tell you to place the transducers as follows: in the bow near the speed log, over the keel, where the prop shaft exits the hull, close to the rudder stock, and one each on the port and starboard side half way between the keel and the rudder
![]() (see diagram).
(see diagram).
 With the cover on
The transducers have two parts, the transducer unit which generates the vibrations and a large wide rimmed plastic nut shaped base which the transducer body screws into. The transducers are glued to the inside of the hull using a two part resin. The clever bit is that the transducers arrive assembled with a thin cellophane membrane covering the transducer but not the nut which prevents the resin sticking to the transducer. The unit is turned bottom up and a thick coat of resin applied to the whole of the underside. It is then turned right-way up and pushed down hard onto the inside surface of the hull causing resin to fill any imperfections on the hull surface with the surplus squidging out around the side. After the resin has set the transducer can be unscrewed from the base nut and the cellophane membrane peeled off. The transducer is now screwed back into the base and the cable attached with the waterproof connector.
With the cover on
The transducers have two parts, the transducer unit which generates the vibrations and a large wide rimmed plastic nut shaped base which the transducer body screws into. The transducers are glued to the inside of the hull using a two part resin. The clever bit is that the transducers arrive assembled with a thin cellophane membrane covering the transducer but not the nut which prevents the resin sticking to the transducer. The unit is turned bottom up and a thick coat of resin applied to the whole of the underside. It is then turned right-way up and pushed down hard onto the inside surface of the hull causing resin to fill any imperfections on the hull surface with the surplus squidging out around the side. After the resin has set the transducer can be unscrewed from the base nut and the cellophane membrane peeled off. The transducer is now screwed back into the base and the cable attached with the waterproof connector.
It took careful planning and a few days to run the cables, fix the transducers and mount and connect the control unit but on the 26th November 2010 the system went live only time will tell how effective it will be.
2011 Update. It's now four years since antifouling paint was applied. I have been very pleased with the ultrasonic antifouling. In summer I regularly free-dive under the boat while at anchor to check the state of the hull and clean where necessary. This summer there were almost no barnacles apart from small ones at the waterline and almost no horrible white "worm" casts which even antifouling paint doesn't prevent.